Friday, January 14, 2011

Method of sewing " One shoulder dress"

Plain frock or an” A” line frock draft can be converted to one shoulder frock. Neck and arm hole is stitched with fitted facing. Interfacing can be sandwiched between the bodice and the facing to keep the shape of the bodice. We can also prepare a casing along the neck line and pass elastic through to keep the neck line in position. In place of the other shoulder spaghetti straps  can be used as support. Satin ribbon bow looks great.


Method of drafting front of the bodice.
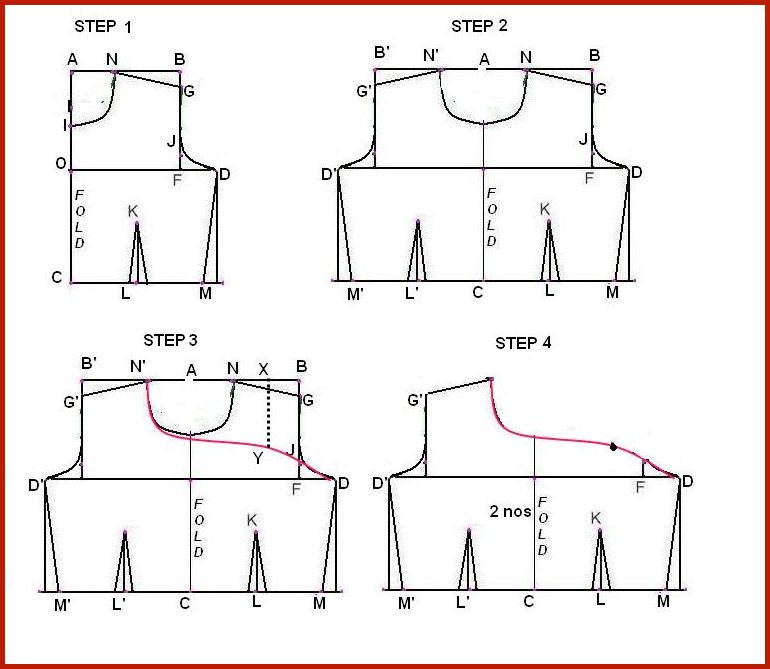


Keep A-C on Fold. A-C = Waist length + ½”.
A-O =¼ chest-½”.
From the points A, O, and C draw perpendiculars.
A-B = ½ shoulder width + ¼”
A-N =¹/12th chest +¼” or to taste
A-I =¹/12th chest +½” or to taste
shape neck N-I as shown in the figure
O-D =¼ chest +1½”.O-D =C-E
M-E =⅛” .Join D-M.
B-G =½”. Join N-G
F-J =1”.Shape G-J-D front armhole as shown in the figure.
L is half of C-M.A dart of ⅛” is taken along the line K-L as shown in the figure.
Open the fold of back and front pattern .Now let us do the necessary changes.
Draw a line on the front of the pattern starting from the point N’ on the right shoulder line, going across the front as low as the neck depth and curving to the left armhole.
X is the midpoint of N-B.Draw a perpendicular X-Y to the line N-B it meets the neck curve at Y. Mark that point. Straps are fixed to this point.

Cutting

Back and front drafts are the same. So cut draft in duplicate. Use one for the front and other as back.

Stitching

Stitch the right shoulders together. Finish neckline with  fitted facing  sandwiching interfacing in between. If you want to pass elastic do not use the interfacing. Pass ½” wide elastic whose length is 2” less than the curve of the whole neck line and secure the elastic at the ends.Stitch the sides together. Stitch the darts, Attach the bodice to the skirt portion as usual. Prepare  spaghetti straps by using  Fabric tubes  Fix the spaghetti straps or satin ribbons at the point Y both in front and back of the bodice
I f you want to stitch an “A” line frock take the draft of the front and follow the same method.

Photobucket

Thursday, January 13, 2011

Baby's Matinee jacket

Baby’s matinee jacket is a simple infant garment which is easy to sew.


Materials needed

Materials suitable are Cots-wool, flannel and flannelette
Matching piping

Pattern making 


Fold the paper in 2 layers and prepare the draft.
A-P = full length +½”
A-B =¼ chest –½”
Draw perpendiculars from A, B and P
A-C =½ shoulder
A-G = back neck=½”
A-H = front neck = 1½”
A-F =¹/12th chest
Join F-G and F-H with curves
Mark S on the line A-P such that P-S =1½”
A-C =B-D. Produce B-D to E such that B-E =¼ chest +1½”
C-M = Full sleeve length measured from shoulder tip to wrist +⅛”Draw a perpendicular from the point M to the line A-M.
M- N =A-B
M-U = sleeve width +½”.
M-O =½”
Join U-O with a curved line as shown.
Produce P-Q to R such that such that R-Q =1½”
Join R –E. Mark T on R-E such that R-T =1”. E-V=¾” join U-V-T as shown.
Join T-S with a curve as shown
Cut along the line O-U-V-T-S.
Cut back neck A-F.
Open the fold and cut front neck F-H

Cutting the fabric


Place the draft on the material as shown in layout 1 or layout 2.
Cut front opening H-S

Stitching

Finish the sleeve with matching piping. Join the sides. Over cast the seam or pink the seam and open.
Finish the curved line T-S and front opening together at one stretch with piping. Finish the neck with piping Leave extra piping on either side of the neck for tying a bow
Or you can stitch button and loops (Type 2)
Photobucket

Tuesday, January 11, 2011

Zari langa blouse aka pattu pavade aka long skirt and blouse


I have stitched these long skirt to my sister's grand daughter.


Photobucket

Sunday, November 28, 2010

How to draft princess seam blouse from basic sari blouse draft


Please see this site. There are many Princess cut blouse models. http://www.only-ladies.com/2009/03/blouse-neck-patterns.html

Photobucket

Method of sewing zip to a garment.

Attach facing to the neck line. (I have shown only the back side of the garment here as it is difficult for me to show both the sides that is front and back.) Press under the seam allowances of the back opening
Close the zip. Mark the length of the zip on the garment. Stitch the seams together on the fold line till the mark and press the seams open
Pin the zip to the edges to the folded seam allowance such that the center line of the zipper coincides with the edges of the seam allowances and the zipper tab end should be placed ½” below the neck line seam. Trim off the zipper tape just below the neck line. Baste the zipper to the garment. Do the same thing for the other side also
Using the zipper foot machine stitch the zipper to the garment. . Fold the neck facing and finish the neck line using hem stitch
Photobucket

Tuesday, November 23, 2010

How to sew seams - Part 2


French seam


French seam is a strong seam. I can only be used on straight seams. Finishing of the seams is not needed. It is very useful for stitching under garments and sheer fabrics; it is not suitable for heavy fabrics.
Stitching method.
Keep wrong sides of the material together, Stitch on the right side ¼” away from the seam line in the seam allowance.
Trim the raw edge to 1/8” from the line of stitching and turn to the wrong side.
Crease the joint, press. Fold on the line of the joint. Stitch on the seam line.
While stitching care should be taken such that the raw edge of the seam does not show on the right side.

Flat-fell seam.


This seam is used for men’s shirts and pajamas. It has got two parallel rows of stitches.
This is the strongest seam.
Keep wrong side of the fabric together and stitch on the right side on the seam line .Trim one side of the seam by ¼”. Turn under the raw edge of the other seam and place it flat on the trimmed seam and top stitch close to the folded edge
Photobucket

Monday, November 22, 2010

How to sew seams - Part 1

Seams are the lines of stitching which hold two pieces of fabric together. There are many types of seams. The type of seam we use depends upon the fabric.

Plain seam

This type of seam is used for firmly woven fabric that does not ravel easily. Double stitched plain seam gives added strength. If we want to open the seam to give smooth fit double stitching is done one above the other.

How to make plain seam

Keep the two pieces of the material to be joined, right sides together and make a single row of machine stitching ½” from the edge. Beginners can mark the seam line and tack before machine stitching. Make a second row of stitching 1/16” from and parallel to the first row in the seam allowance

Methods of finishing plain seam


1. Pinking
 
It is used for firmly woven fabric. After stitching the seam is trimmed with pinking shears

2. Overcasting

This is also used on firm fabric. After seam is stitched the edges of the seams are stitched together with over casting stitches by hand or the seams can be opened and overcasting is done separately.

3 Hemming

This is used on the fabric that ravels. After stitching, the seam is opened and the raw edges are turned inside a little and machine stitched.


4 False French

This method id used on sheer fabrics to get neat finish .This adds strength to the seams. After stitching, seam is opened, raw edges are turned up and brought together and hemmed by hand

5 Bound seam 


This method is used on fabric that is heavy and ravels easily. After stitching, seam is opened and the raw edges are bound separately with bias strips.

Self binding 


This method can be used for the seams that can be turned towards one side. Stitch seam .Trim one layer of seam allowance to ¼”. Turn and press the other seam allowance towards the trimmed side. Turn again over the trimmed side and stitch.

Zigzag stitched.


Stitch seams. Finish the seams with zigzag stitches placed to the edge of the seam allowance.

Seams in sheer fabrics.


Place the fabric right sides together. Stitch them together 1/8th” from the seam line with in the seam allowance. Fold and press both the layers over the stitching. Stitch close to the folded edge.>Trim the seam allowance close to the stitching.Turn again and stitch close to the edge such that the stitches should fall on the seam line. This makes almost invisible seam

Photobucket