Saturday, November 14, 2009

Basics in sewing-Taking body measurements


Shoulder =A-B = Measured from the prominent bone at the end of one shoulder to the prominent bone at the end of the other shoulder.
Chest = Measured around the fullest part of the chest= C-D
Waist line. =Measured around the natural waist line= G-H
Hip = Measured around the fullest part of the hip=I-J .Usually 7” to 8” down from the waist line.It is also called seat measurement.
Upper arm = biceps =.Measured around Q-R
Sleeve width= Measured around the edge of the sleeve =O-P.
Sleeve length= Measured from B, on shoulder line, to the edge of the sleeve S
Full length for the bodice = E-F Measured from the shoulder line to waist.
Full for skirts, Salwar etc… = Measured from waist line to the bottom edge of the garment
Neck width=1/12th chest + 1/4"or to taste.
Front neck depth=1/12 th chest + 1/2 " or to taste.
Back neck depth1"+1/2"or to taste.
Full length of long skirts= M-N . Measured from nape of the neck to the bottom edge of the skirt .

Friday, November 6, 2009

Pavade Blouse( Blouse worn on long skirt)


Draft

layout
pattern pieces
Measurements

Chest
waist
shoulder
full length of the blouse= G to H
sleeve length from = A to N
sleeve width
Sleeve band width
refer here for taking mesurements

Bodice

A-B (On fold) =length of the blouse+1”
A-L waist length
A-C = ¼ chest-½”
Draw perpendiculars from the points A, C.L and B.
A-D = shoulder width +¼”
C-F =¼ chest +1½” K-N-F-O-G-H-I-C-L-B-K
B-K =F-C
A-C =D-E
J-N =½”
Join and shape F-N-K
D-O =½”
Join G-O
G-A =1/12 chest + ¼” or to taste. A-I = 1/12 chest + ½” or to taste. A-H =1
Shape back and front neck G-H and G-I
M is midpoint of J-L .A dart of ½” is stitched at the point M on both front and back of the bodice
E-E” -1”.Join and shape front armhole- E-E’-O. Join and shape back armhole F-O
Cut the draft along K-N-F-O-G-H-I-C-L-B-K. This includes front and back of bodice.
Separate front and back by cutting along the line A-B. Keep one portion aside. This is the back of the bodice. On the other portion cut front armhole shape F-E-E’-O and front neck shape G-I. This portion is front bodice draft. An extra ½”extension is added along the line A-B while cutting the material for stitching button stands. If there is more material right and left button stands can be cut along with the bodice.


Sleeve


Q-P = length of the sleeve+2”for puff - width of the band
S-Q =¼ chest+1¼”
S-T=1/12 th chest+¾”.R-P = S-Q
R-W =½”Join T-W. S-X =1/12th chest. X-U =½”
Join and shape T-X-Q back of the sleeve.
Join and shape T-U-Q front of
V-W =½’
Shape V=P.
Sleeve band
Length = a-b= c-d= width of the sleeve ( sleeve round)+ ¾” for seams
a-c=b-d=double the width of the band + 1/4"

Friday, October 9, 2009

Some other designs of pinafore dresses


Denim pinafore


Draw a perpendicular line from the point I to the line A-D.On this line mark point M such that it is just below the mid point of H-C
I-U is the waist length.U-V is 1½" wide..size of the pocket is decided according to the size of the dress and taste.
Draw lines on the Simple pinafore draft as shown in the figure (pink dotted lines).Please refer here
Bib -Cut along U-N-M-I (-IU on fold) ---2 pieces
Waist band- Cut along U-’N’-O-V (U-’V ‘on fold width U-’V’ being double the width U-V in the skirt)—2 pieces
Back skirt - Cut along V-O-H-B (V-B on fold)
Front skirt – Cut along V-T-P-H-B (V-B on fold)
Pocket layer 1 - Cut along S-T-O-P-Q-R--S
Pocket layer 2- Cut along S-T-P-Q-R-S
See the different parts in the figure.
While cutting on the material leave ½” all around except for the sides for seams
Parts 


Stitching

Skirt front -Keep pocket layer 2 on skirt front, right sides together along the curve T-P .clip at 2 or 3 places .turn the pocket layer inside and press.
Keep and pin the skirt front on the right side of the pocket layer 1 such that points T-S-R-Q-P Match (consider all the three layers-Skirt front, pocket layer1 and pocket layer 2).Stitch pocket layer1 to pocket layer 2 along the line S-R-Q Baste the pocket to the skirt along the line S-T and P-Q.Other side of the pocket is also stitched in the same manner.
Stitch the Waist band along V-O to the skirt front keeping wrong side of the skirt and the right side of the band together. Press .Fold ½” along the line U-’N’ and again fold to the front and stitch to the right side of skirt along the line VT. Waist band is attached to the skirt back in the same manner.

Bib

Bias bind arm hole and neck line .Attach bib to the waist band keeping the waist band ½” above the line UN of the bib
Stitch the sides of the skirt together
Shoulder straps –Fold ½” and stitch along the length of the shoulder strap. Attach them to the front and back of the bib.Stitch the bottom hem by folding 1". Finally top stitch .

Thursday, October 8, 2009

Simple pinafore dress


Method of drafting


A-B = length of the dress + 1” + 1/2 “
A-D -= I /4 chest+ 1/2”
Draw perpendiculars from A, D and B and mark the points C, E and F as follows:-
A-C = shoulder width + ½ “
D-E=1/4 chest +1” + ½”
B-F = D_E + 2”
A-C =D-L .Mark point G on C-L such that C-G = ½” Join H-G
Join E-F. Mark H such that H-F =1”
A-H = 1/12 chest + ¼”. A-I = 1/12 chest + ½”
A-K=1”
Shape back neck K-H, Front neck I-H.Shape scye C-G-E. Shape bottom .B-H

If the cloth is wide enough button stands can be cut along with the back as shown. Otherwise separate pieces are joined.

 Parts


 Stitching

Join left and right of the back pieces till the button stands. (Shown by dotted line) 

Stitch right and left button stands .Join shoulders .Stitch neck and armholes with matching piping. Stitch

sides. Finally fold bottom by 1” and hem.

Tuesday, September 15, 2009

How to fix sari fall

Selecting fall
Usually we select fall that matches the border. For light colour sari I prefer to select fall which matches the body colour. If the colour of the fall bleeds whole sari will be spoiled.
Selecting the thread
Selection of the colour of thread depends upon the place where the stitches fall.
Preparing the fall
Soak the sari fall in salt water for 15 minutes, wash, dry and iron.
Stitching the fall
Stitch the side edges of the fall with machine or hand stitch.
Lower edge of the sari is stitched with small running stitches adding back stitches in-between. Daily ware sari is can be stitched by machine with zig- zag stitch.
Step 1

Spread the sari on a flat surface. Secure the fall with pins to the sari so that there or no wrinkles. Thread

the needle with one strand of matching thread (I have used different thread so that it is easily visible in the

image.). Bring the needle out at A from the back of the fall.

Step 2

Take a small stitch BC (Go down at B come out at C) on the sari just below the point A
Step 3


From the point D near to A( point D should be very close to Point A) Take Big stitch DA'.This stitch should

be under the fall only. Stitch should not visible on the sari.( please see the line diagram also) Stitches AB

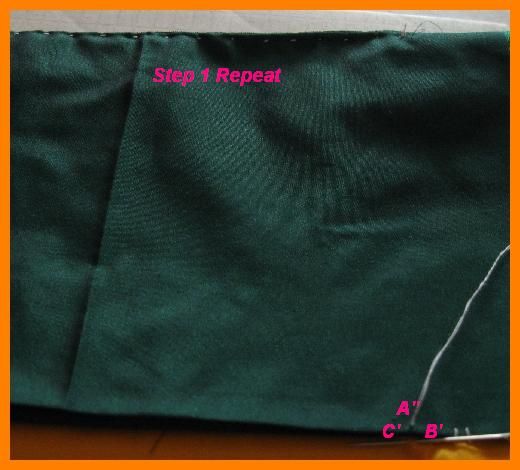
and CD will be together like two vertical stitches. These stitches are seen in the image” step 1 repeat “

these are one set of stitches.
Start second stitch from A' and continue.This is called slip stitch
Step 1 repeated

Right side of the sari

Wednesday, June 3, 2009

Six piece sari petticoat


Measurements needed
Waist
Hip- measured around the widest part of the hip. Usually 7” or 8"
below the waist line.
Full length
Width of the waist band.
Instructions for drafting
Line A-F should fall on the fold
A-F= full length –Waist band width .
Mark point D on A-F such that A-D =7 “or 8”
Draw perpendiculars from A, D and F
A-B =1/8 waist +1/2”
A-C =1/2 “
D-E =1/8 hip + ½”
Join B-E and produce. This line meets the perpendicular drawn from F at G.
G-H =1/2”
Shape B-C and F-H
Cut along C-B-H and F
Cut along the folding line C-F and separate the sheets.

Layout 


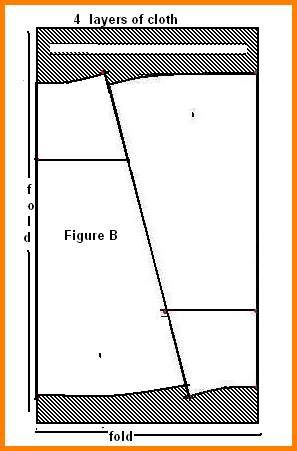
Fold the material twice, making 4 layers. Place the paper draft on the cloth as shown in the figure B and cut.

Parts


We get 6 panels 2 central panels, 2 right side panels and 2 left side panels as shown in figure C

Stitching 


Join the side panels to the central panel. 2-8 to 3-9, 4-10 to 5-11. Do the same thing to the other set .We get 2 pieces A and B, one set for back and the other for front. as shown in the figure D

Now we have to join front to back.Keeping right sides together join front to back. Join 1-5 to 4-8. On the other side keep an opening of 6”. Join9-6 to 10-7.Do not stitch the portion 2-9 and 3 -10 together.Turn them inside and stitch separately. This is the side opening.

waist band


Measure the top of the petticoat (waist line) and cut a waist band ABCD 6” wide and length equal to the top of the petticoat + I”. Fold ½” on ends A-C and B-D of the waist band and stitch. Fold ½” along A-B and C-D and crease Open the side A-B and attach it to the petticoat top from inside. Keep right side of the band and the wrong side of the petticoat together and stitch on the crease made earlier .Fold the band length wise stitch the edge C-D to the waist line so that the fold just covers the machine stitching at the waist line. Turn the bottom of the petticoat by 1” and stitch.-Run a draw string along the waist band.