Sunday, February 21, 2010

Simple Kurthi & Angarakha style kurthi


Kurthi is shorter version of simple Kameez. Usually its length reaches the hips. It can be stitched with various types of fabric. It can be stitched short or long with various types of neck and sleeves. Draft of Kurthi is same as the draft of simple kameez except for its length. The length of Kurthi is measured from the nape of neck to hip.

Angarakha style Kurthi is one such variation. It's got a specific cut to it, in which it opens from the front and overlaps to the side, and is typically tied with a hook or a dori

Method of drafting simple Kurthi

Prepare a draft by following the method of drafting Simple kameez .Shorten its length till hip-line or to taste.This is Kurthi draft.

Method of converting simple Kurthi draft to Angarakha stye Kurthi

Back

Keep the back as it is.There is no change.

Left front

Step 1

Place the draft of Kurthi front on a sheet of paper and draw the out line. Add 2”allowance outside the center front line A-B.

Step 2

Change the neckline to curved V shape.as shown in figure 1


Right front

Step 1

Fold the extension of the Kurthi left front (just now prepared) back on the line A-B. Place it on a folded sheet of paper such that line A-B falls on the fold of the sheet of paper. See figure 2

Step 2

Draw the outline of the draft.Cut along the line and open the fold. Shape the neck curve extension the as shown in the figure by dotted line. This divides the draft into two parts-Part 1 and part 2.

Step 3

Cut and remove the shaded part 2 .The remaining portion part 1 is Kurthi right front.

Sleeves

same as Kameez sleeves


Photobucket

Monday, February 15, 2010

Anarkali top with panels flaring from the waist


Method of drafting Panels starting from waist line.

Refer the draft   . Fig 4.     Pin panel No 1 on a sheet of paper extend the line U-V on both directions to the points 5 and 6 by 3” or to taste, as shown in the above figure . Join the points 5 and 6 to the points I and I’ respectively which are the points of intersection of the panel lines to the waist line. Follow the same procedure to add flare to other side panels. For the middle panel line is extended on only one side.


Photobucket

Anarkali dress top with panels


Using basic Anarkali top bodice draft various other styles of Anarkali tops can be drafted .Anarkali top with panels is one of them. Even in this there are two types. In one type Panels flare from the bust line. In the other panels flare from the waist line.
 Anarkali top with panels flaring from the bust line

Method of drafting

Step 1


Place the draft of the front and back of bodice of Anarkali top on a paper as shown in the figure 1 Fold of the draft should fall on the fold of the sheet of paper.Trace the out line of the draft.Mark back and front shapes of armhole and neck.Remove the draft.

step 2


On the fold of the paper mark point Y such that A –Y is equal to the length of the dress. From the point Y draw a perpendicular line Y-U such that Y-U =E-G. Join U-G. Now we have to divide chest line F-D in to panels of equal width. If the chest line is not devisable equally add the reminder to the side panels. On the chest line F-D mark points P, Q and R such that such that side panels F-P =P-Q= Q-R.and the middle panel R-D = ½ Q-R. Through these points draw linesX-X', W-W', and V-V' parallel lines to the line Y-A. These lines divide the front and back of the dress into seven equal parts each. R-D, which is on the fold, is the middle panel. In this manner we can make as many panels as we want. See Figure 2 .

Step 3


Transfer these lines to the fold of the paper which is below keeping carbon paper between the folds of the paper. Cut along L-K-T-F-G-U-Y-L. Separate the sheets by cutting on the fold lineY-L.Take away one sheet which is below.This is the draft for the half portion of back. On the other sheet which is on the top cut the front neck line K-M and front armhole shape T-N-F. This is half portion of the front. See Figure 3. Number the panels as shown in the figure. Numbering the panels is important as we have to stitch them together in the same order.
Panel 1, 2 and 3 are side panels of the front
Panel 4 is half of the middle panel of the front
Panel 5 is half of the middle panel of back
Panel 6, 7 and 8 are side panels of the back

Step 4 


Divide draft into panels by cutting along lines X-X' , W-W' and V-V' and separate the panels as
shown in the figure 4.

step 5
Method of adding flares to the side panels

Pin panel No 1 on a sheet of paper extend the line U-V on both directions to the points X and Y by 3” or to taste, as shown in the figure5 These points X and Y should be joined to the points F and P’ which are the points of intersection of the panel lines to the bust line. Cut along the outline of the shape. Follow the same procedure and add flares to remaining side panels .While cutting the fabric side panels should be cut in duplicate. One set for the right side and the other set for the left side.

step 6
Method of adding flare to the middle panel


Pin the panel 4 on to a folded sheet of paper such that the line Y-L is on the fold. Produce Y-X to A such that X-A is 3”. Join R-A.cut along the line-A-R-X’-L-D-E-Y and open the fold. This is Back middle panel .Follow the same procedure for the front middle panel 5. Cut along the line A-R-X’-M -D-E-Y . Open the fold.This is the front middle panel.See figure 6.


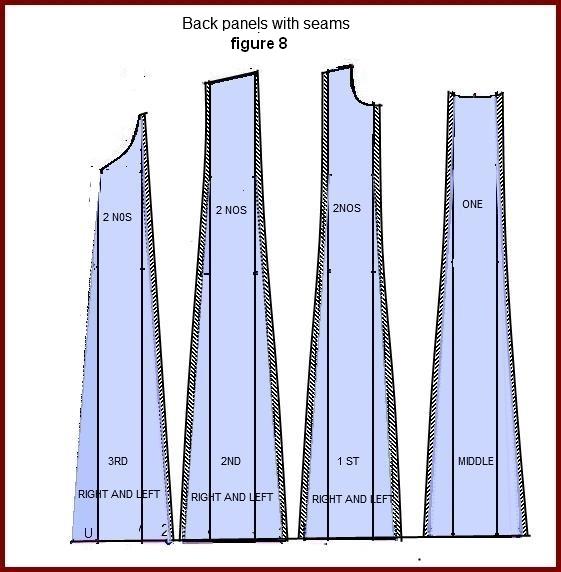
Add ½” seam for all the panels as shown in the Figure. Mark the seam line.

Stitching.

Stay stitch neckline, armscye and slant cut of the panels.It is better to Tack the panels together and then machine stitch.This prevents the panels from streching.stitch the rest of the dress as usual..

Photobucket

Wednesday, January 13, 2010

Anarkali salwar set top


Anarkali salwar top has two portions, bodice portion and skirt portion.It is figure-hugging till the upper torso and below that, it turns into a frock and gets a lot of flare.Length of the bodice will be up to lower border of the ribcage . Anarkali suits are worn with churidars . This dress can be stitched with plain sleeve, ¾ sleeve, full sleeve or sleeveless. Skirt can be gathered,pleated , flared , half circular or circular.
Circular cut skirt is also called umbrella skirt. There will be no side seams and no gathers in the waist.It requires material with wider width. If material with wider width is not available it can also be stitched by joining two pieces together such that joint comes at the back of the skirt.Anarkali dress looks good if it is stitched with flowing material like chiffon

method of drafting

Measurements need

Chest
Waist
Shoulder
Bodice length- measured from shoulder line near the neck to the lower border of the ribcage. (depends upon one's taste also )
Full length - from shoulder line to bottom of the dress.
Sleeve length
Sleeve round


Body front and back

A-E =Bodice length +1"
A-D =¼ chest -1”
Draw perpendiculars from the points A, D, and E
A-B =½ shoulders + ¼”
A-K = Neck width =1/12th chest or to taste
A-L =Back neck depth =1¾” or to taste
A-M = front neck depth 1/8th chest or to taste
D-F =¼ chest +1½” (if loose fitting is needed 2 “to 2½” can be added)
Mark point S on D-F such that D-S =A-B. Join B-S. On this line mark N such that S-N = 1½”
N-O = ¾”
Mark T on B-S such that B-T = 1”. Join K-T. Shape back neck K-L, front neck K-M as shown.
Shape front arm scye T-N-F and Back arm scye T-O-F
E-G =D-F and G-I =½”. Join F-I
Mark U on E-G such that E-U = 1/12th chest+ 1/2"
P-U= length of the dart = 1/6th chest

Skirt


B-D =1/6th waist
A-D=Full length -bodice length +1½”
From B draw perpendicular B-C.
B-E =B-D and E-C = A-D Shape D-E and A-C as shown in the figure

Sleeves

refer here
Layout

Bodice


Place the draft prepared on the fabric as shown in the lay out and cut the different parts . While cutting the bodice back an extra extension of 1½” is added along the line L-E for button stands( shaded area). If the material is not wide enough ¼” of the extension is added for seams along the line L-E and while stitching separate pieces are attached.

skirt

Skirt is generally cut without a seam at the circumference if the material if wide enough. When the width of the material is not wide enough same material can be joined at one side. While stitching care must be taken to keep the joint at the back.

Step 1


Place the draft on the material and mark the outline. Mark the place A –B where extra piece to be added.
Step 2


Cut the extra piece of material beyond the outline.
Attach it along the line A-B taking care to match the grain.

Step 3


Place the draft on the fabric thus stitched and cut the draft

Stitching

1. Stay stitch neck line, Shoulders, armscyes and top of the sleeves.
2. Stitch button stands (Plackets)
3. Stitch darts of width ¼ “
4. Stitch neck by giving piping or flat facing or fitted facing
5. Hem the sleeve edges.
6. Stitch the sides of the sleeves and sides of the bodice.
Measure the waist.
7. Cut a slash of 3” in the waist line of the skirt .Stitch it with continuous bound placket.
Measure the waist of the skirt. It should be equal to the waist of the skirt.
8. Attach the skirt to the bodice.
9. Finish the Curved bottom of the skirt by hemming


Photobucket

Monday, January 11, 2010

Method of stitching strap keepers


Strap keepers work in two ways .They prevent bra straps from peeping out of the neck and also prevent wide neck lines falling away.
Prepare fabric tubes from the fabric which was used to stitch the garment. The length of the fabric tube taken should be little more than the shoulder line of the garment. It should not be too long or short. Finish raw edges of the fabric tubes by turning them in. Sew the two halves of a press button one on each side of the fabric tube as shown in the figure. Fold the tube in the middle such that the two halves of the fastener face each other and stitch it to the seam of arm scye where the shoulder line is attached to the sleeve. If the length of the tube is too small there will be wrinkles on the shoulder. While wearing the garment one end of the strap is passed under the bra strap and the button is pressed together.

Interchangeable strap keepers 


Take ¼” wide satin ribbon. Let the length of the ribbon be little more than the length of the shoulder line. Stitch the raw edges. Sew the two halves of press fastener one on each side. stitch the middle of the ribbon to the safety pin as shown in the figure. This can be used as a strap keeper by fixing the safety pin to the seam of the arm scye where the shoulder line and the sleeve meet.

Photobucket

Friday, January 8, 2010

simple kameez


Measurements needed

Chest
shoulder
waist length
Full lrength
Hip
Sleeve length
Sleeve round

for taking measurements refer here

Body front and back


A-C = full length +1”
A-D =¼ chest -1”
A-E =waist length
Mark point R such that E-R = 7” (for seat line)
Draw perpendiculars from the points A, D, E, R and C
A-B =½ shoulders + ¼”
A-K = Neck width =1/12th chest or to taste
A-L =Back neck depth =1¾” or to taste
A-M = front neck depth 1/8th chest or to taste
D-F =¼ chest +1½” (if loose fitting is needed 2 “to 2½” can be added)
Mark point S on D-F such that D-S =A-B. Join B-S. On this line mark N such that S-N = 1½”
N-O = ¾”
Mark T on B-S such that B-T = 1”. Join K-T. Shape back neck K-L, front neck K-M as shown.
Shape front arm scye T-N-F and Back arm scye T-O-F
E-G =D-F and G-I =½”. Join F-I
From R draw a perpendicular line and mark point V on that line such that R-V =¼ seat +1½”

C-H =¼ hip +2” shape I-S-H
C-J =½” shape kameez bottom J-H
Join side  F-I-V-H.

Darts

Mark U on G-E such that U-E =1/12th chest +1/2".P-U =U-Q =1/6th chest

sleeves


A-B = Sleeve length
B-J =1½” or 1" for folding
Draw perpendiculars from A, B and J.
A-C = ¼ chest -1” . A-C =B-D. Join C-D
 Mark L on the line A-C such that A-L =1” .
Mark E on the line D-C such that E-C = ½ of A-C
B-I = ½ sleeve round + 1”
J-K=1/2"   more than B-I .
Join I-E and I-K Join E-L. G is mid- point of E-L.
H-G = 3/4 “.Draw a line  E-F perpendicular to E-C such that E-F = = 2” Join E-F-L and E-H-L. As shown

Cut the draft along the line K-T-O-F-I-V-H-J-C-R-E-D-M-L-K.Separate the sheets. Keep one aside. This is the draft of the kameez back. In the other portion cut the front neck shape K-M and front scye shape T-N-F.
Cut the sleeves draft along the line A-B-J-K-I-E -H –L-A. Open the fold .Cut the front sleeve shape E-F-L-A Draft of the sleeves is ready.

Layout


Place the paper drafts on the fabric as shown in the layout and cut the different parts of the kameez.

stitching

Stay stitch neck, arm scyes and top of the sleeves.

Stitch the back opening of required length as explained here.

Join the shoulders.

Stitch darts starting from one pointed end to other pointed end . Fasten the threads at both the ends.
Stitch the neck with flat facing or fitted facing
Pin the sleeves to the arm scye, keeping right sides together ,taking care to pin sleeve front to body front and shoulder line to the middle line of the sleeve .Tack them together easing wherever necessary. Machine stitch them.


Join the sides of sleeves and sides of the body, starting from the sleeve end and to the point where the slit starts.Length of the slit depends upon the taste of the wearer.Minimum length of the slit that one could have is from waist line to hem line,that is V-H.    Usually two lines are stitched side by side .But they should end at  point V, where the slit starts as shown in the figure Turn the slits inside and stitch. Stitch the bottom of the kameez .


Photobucket

Thursday, December 24, 2009

Method of stitching a neck with fitted facing


Using these drafts cut facing pieces (figure 1)


Method of attaching facing to the Garment


Stay stitch the neck of the garment and the facing,
Stitch shoulder seams of the garment and the facing keeping the same seam allowance. Open the seams and press. (Figure 2)
Fold the lower edge of the facing by ¼” and press. Keep the facing flat on the garment, right sides together, matching the shoulder lines and the contour of the neck. Baste them together. Machine stitch on the seam line. Trim the seam by ¼”. Clip the curved edges and cut the corners a little, taking care not to cut the stitching. (Figure 3 )
Press the seams towards facing secure them by under stitching on the right side of the facimg.Turn the facing inside on the seam line such that facing is not visible from the right side and it lies flat on the garment.Press.Secure the facing against the garment with short hemming stitches Figure 4
Photobucket