Wednesday, May 18, 2011

Method of stitching Katori Blouse


Basic sari blouse draft of front and back are prepared on a folded sheet of paper. Folded sheet is cut along the fold line and the draft of the back is removed. The remaining details are drawn on the front portion.For basic sari blouse draft please refer      here.

Step 1
Mark A-B the full length of blouse + 1” on the fold line.
On this line Mark point K such that A-K = back neck depth =¹/12th chest or to taste.
Mark point L on the line A-B such that A-L =front neck depth =1/8th chest or to taste.
Mark point D on the line the line A-B such that A-D = scye depth = ¼ chest-1¼ or 1½.
For details about scye depth refer      here.
A-M = front length + ½”.
Draw perpendicular lines to the line A-B from the points A, D, M and B.
On the perpendicular line at A mark A-C = ½ shoulder + ¼ “.
On the perpendicular line at D mark point E such that D-E = ¼ chest +1½”.
On the perpendicular line at M mark point N such that M-N = D-E.
On the perpendicular line at B Mark F such that B-F = D-E.
From the point C drop a Perpendicular. It meets the line D-E at the point H.
On the line C-H mark points R such that C-R = ½” or ¾”.
Join the points G and R.
Mark point J on the line C-H such that J-H = 1”.
Mark point I on the line B-F such that I-F = ½” Join the points E and I.
Line E-I intersects the line M-N at the point O.
Join points K and G by a curved line as shown in the figure. This is back neck line.
Join points L and G by a curved line as shown in the figure. This is Front neck line.
Now cut along the line K-G-R-E-O-I-B.
Separate front and back draft by cutting along the fold line K-L-D-M-B.
Keep back draft (on which there are no markings) aside.
Step 2


Take the front draft on which neck and front scye Markings are there.
On the line D-E mark point Z such that Z-H = 1/2' to 3/4".This is for the bust measurements up to 33".For bust size more than 33" shift the point Z to towards H and continue.
S is the midpoint of D-Z.
From the points S and Z drop perpendiculars. These lines meet the line M-N at point 2 and 3. respectively. On the line S-2 mark point T such that S-T =1/8th chest -1½”.
For further details about the point T see     here.
Through the point T and on either side, draw a line parallel to the line M-N. This line cuts the line A-M. at the point 4 and the line Z-3 at the point V.
On the line A-M mark point P such that 4-P = 1”. This is for chest measurement below 36".For bust measurements 36" and above increase this measurement to 1¼” or 1½”
On the line  Z-3  mark point Q such that  V-Q = 1”.This is for chest measurement below 36".For bust measurements 36" and above increase this measurement to 1¼” or 1½”
Join P-T and T-Q.
Paste a small piece of paper of width 2” along P-X outside the line A-M.
Produce the line V-4 to U such that length of line P-T + the length of the line T-Q = length of the line V-U.
Paste a small piece of paper of width 2” along the line M-N.
Produce line 4-M to X such that 4-X = P-M.
Produce line V-3 to W such that V-W =Q-3.
Join U-X. On U-X mark point Y such that X-Y = 1”.
Join W-Y by a curved line as shown in the figure.
Produce T-2. It cuts the line W-Y at point 5. At this point take a dart of ½”.
Point 1 is the midpoint of the front neck line. L-G. Join 1 and Z by a curved line as shown in the figure.
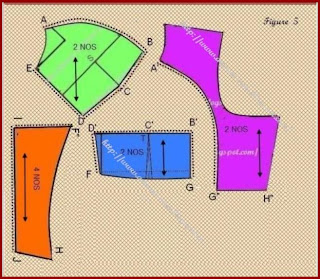
There are three pieces in the draft. I have coloured them with different colours .Please see figure 3.


We have to separate them.
Piece no 1 is side piece.
Piece no 2 is Katora piece .
Piece no 3 is Under bust piece.

Cut front neck line along the line L-I-G.Cut along the shoulder line G-R and front scye shape R-J-E. Cut along the E-O. Cut along O-3.
Cut along the curve 1-Z-Q-V- 3. This is piece no 1 or side piece.
 To separate piece no 2 or Katora from piece no 3 or under bust piece cut along the line P-T-Q.
Cut along the line U- 4 -T-V-3-W-5- X-Y-U to get under bust piece.


Waist band

1-2 = (A-B -  A-M )=(Full length of the blouse–  Front length of the blouse) +½”.
2 to 4 = M-O (refer fig 2) -1”.
4-3 = 1 to 2 -¾ or 1”.
4 to 5 = ½”.
Join 1 and 3 by a curved line as shown.
Join 3 and 5.
Cot along 1-3-5-2-1.

Sleeves

Refer  sari blouse
While cutting the fabric take ½” extra for seams as shown in the figure 5 by dotted lines. Arrow mark shows length wise of the cloth. To get good fitting the  Katora piece  which is   coloured in green should be cut on bias as shown in the figure 5.


Stitching

 Fold the under bust piece which is coloured blue along the line T-5 and stitch ½” dart. Open the fold and press .See Figure 6 .

Place the under bust cover on the katora ,Keeping right sides together and place D’ on D, C’ on C and B’ on B . See figure 7. Stitch them together along the line D-C-B, ¼” from edge. Make small snips along the stitched edge  taking care to not cut the stitches. Open and press. See figure 7.

Keep the side piece which is coloured pink  on katora and under bust which are stitched together, keeping right sides together and Point A on A’ G on G’ and stitch ¼” away from the curved edge . Make small snips and turn the seam and press. See Figure 8

 Out of 4 waist band pieces  take 2 pieces of the belt and  stitch them together along the edge I-J and turn the seam inside fold and press. Place the belt on under bust piece and side piece which are stitched together, matching points F and F’ and H and H’. See figure 9.


This is left front of the blouse. Stitch right front also in the same manner.
Complete sewing the blouse as an ordinary sari blouse.
Photobucket

Thursday, April 21, 2011

Night dress for young girls


This night dress has a shoulder wide round yoke with lining .Gathers of the skirt is sandwiched between the yoke and its lining and stitched. It has got puff sleeves.length of the dress depends according to taste.Yoke and neck can be edged with lace or piping or frills .It has got front opening.Using this draft, sleeveless dress can also be stitched.
Dress
Prepare child’s basic bodice draft as in Fairy’s costume (figure 1)

Separate front and back of the bodice. (Figure 2)

Take a sheet of paper and fold it in to half length wise. A-A’-X-X’ is the folded sheet of paper. A-X is the fold line. Length of the folded sheet A-X should be equal to length of the night gown +1”. And width A-A’ should be equal to or more than line O-D of the bodice draft.
Pin the bodice front on the sheet of paper keeping the edge I-C of the bodice front falls on the fold line A-X and point N falls on the line A-A’. (Figure 3)

Produce D-E to X’ such that O-X =D-X’
Mark P on the line I-C such that I-P =N-G.
Mark point Z on the arm round from where the armhole shape starts to take a curve
Shape the yoke curve P-Z-G Keeping the width of the yoke same throughout. I-N-G- Z-P is the front yoke.
Cut and remove the shape I-N-G-Z-P .This is front yoke folded. Cut and separate along the line I-P. These are right and left front yokes.
Stick these yoke shapes on to another bigger sheet of paper and seams of ½” along the curve .Add extensions for the neck placket, ½” on right front yoke and 1½” on left yoke. (See figure 4.)

The remaining portion of the draft X-C-P-Z--D-E-X’ is used to prepare skirt front.( Figure 5)

Stick another piece of paper behind this draft near the curved line and mark a line ½” above the curved line P-Z .This is for seams. (Figure 6)

Divide the skirt portion in to three equal portions. ( Figure 7 )

On a different sheet of paper draw a line of length equal to twice O-D or to taste. Arrange the panels as shown. Two gaps should be equal to one another. Join the three panels by a new curve P-Z .Cut along the lines P-Z-D-X’-X ( Figure 8 )


Follow the same procedure and prepare back body yoke H-Q-N-G and back skirt Q-Z-G-D-E-Y’-Y
Parts of the night dress

Sleeves
Refer the post     fairy's costume

Photobucket

Tuesday, March 22, 2011

I am deeply annoyed

I had a nasty shock today while browsing the web. I found some of the contents from my tutorial have been copied and posted word for word in another blog http://www.vanitha.tk/ under the heading"hand work" and the author was passing it off as her own. There is no possibility of her having copied the contents from any book as I had not copied it from any book. I have explained it in my own way. The images are my own. I am very much annoyed to see many of my tutorials that I had posted last year have appeared in her blog this year without any prior permission or acknowledgment.
The posts that she has copied are here
http://www.vanitha.tk/2011/03/denim-pinafore.html

http://www.vanitha.tk/2011/03/simple-dressstiching.html

http://www.vanitha.tk/2011/02/chudidar-pyjama-method.html

http://www.vanitha.tk/2011/02/method-of-drafting-pyjama-stiching.html

http://www.vanitha.tk/2011/02/anarkali-salwar-set-top.html

http://www.vanitha.tk/2011/02/anarkali-top-with-panels-flaring-from.html

http://www.vanitha.tk/2011/02/anarkali-dress-top-with-panels-indian.html

http://www.vanitha.tk/2011/02/peasant-top.html

http://www.vanitha.tk/2011/01/pavada-blouse-blouse-for-long-skirt.html

http://www.vanitha.tk/2011/01/pavada-stitching-long-pleated-skirt.html

http://www.vanitha.tk/2011/01/under-stitching-nack-ect.html

http://www.vanitha.tk/2011/01/method-of-stitching-neck-with-fitted.html

http://www.vanitha.tk/2011/01/method-of-sewing-one-shoulder-dress.html

Another funny thing is she has not seen the spelling mistake that I had made and she has posted without correcting it! I will be very grateful If you write your comments in her blog. By doing so we can put an end to this.
Thanks
Photobucket

Tuesday, March 1, 2011

Method of sewing a slip or short petticoat

This is a short petticoat. This garment is worn under kurthi or shirts as underwear. While drafting the pattern care must be taken to keep back neck depth and front neck width more than that of Kurthi. While stitching, side slit of 3” to 4 “should be made. This prevents the slip from rolling up.
 

A-G = full length of petticoat needed + ½”
On the line A-G mark the points I, J, C and E such that
A-C = ¼ chest -1”
A-E = waist length.
A-I = back neck depth = 3” or to taste.
A-J = front neck depth 2” less than A-C or to taste.
Draw perpendiculars from the points A, I, J, C, E and G and mark the points on them such that
A-B = ¹/8 chest + ¼”
A-K = 1/12 chest + ½” or to taste
C-D = ¼ chest + 1½” and C-N =A-B. Join B-N. On this line mark M such that B-M = 1” Join K-M
E-F = ½” less than C-D
G-H = C-D + 2” join D-F –H by a curved line.On this line Mark L such that L-H =¾”
Join G-L by a curved line as shown.
Join front neck line K-J and back neck line K-I as shown.
Cut the draft along the line I-K-M-D-F-L and G.
Cut along the line I-J-C-E-G. Keep the portion on which lines are not marked. This is half of the draft of the back.

Take the other portion and cut along the line K-J .This is the front of the draft.

Photobucket

Friday, February 25, 2011

Method of sewing sleeveless blouse

Using a basic bodice draft , a sleeveless blouse draft can be prepared by making certain changes.
In a sleeveless blouse shoulder width should be less than that of blouse with set in sleeves. Or else the shoulder line droops. It is better to have closer fitting underarm seams. If not under garments can be seen through the armhole. These changes can be done by making following changes in the basic draft
 
Trace the draft of the front and back of the bodice. Mark point X along the shoulder line such that R-X is 3/4" .Produce the side line L-K to Y such that K-Y =3/4". Re draw the armhole line as shown by red dotted line .Do the same changes for the back also. Sew armseye with fitted facing to get good finish.Same method can be followed to sew other sleeveless garments

Photobucket

Sunday, January 30, 2011

Half umbrella cut skirt.


Prepare the draft of the bodice as explained   here.
Prepare the  skirt as explained below.Join skirt  to the bodice


Photobucket

Thursday, January 20, 2011

Method of sewing Magyar blouse


In Magyar sleeves are cut along with the bodice. So there is no need to join sleeve to the bodice. Magyar sleeve can be long or short. It is easy to stitch..
We can prepare the draft of the blouse with Magyar sleeves using the draft of the plain blouse.

Method


Arrange the draft of bodice front and back as shown in the figure.
A-B is the shoulder line of the bodice before cutting the shoulder slope. C-D is the center line of the sleeve. Arrange the drafts such that A-B and C-D are in a line .Distance between the points E and G should be equal to the distance between the points F and H.
Mark points I and J such that E-I =F-J.
Mark points K and L such that G-K =H-L.
Shape the curves I-K and J-L as shown.
Photobucket