Wednesday, June 3, 2009

Six piece sari petticoat


Measurements needed
Waist
Hip- measured around the widest part of the hip. Usually 7” or 8"
below the waist line.
Full length
Width of the waist band.
Instructions for drafting
Line A-F should fall on the fold
A-F= full length –Waist band width .
Mark point D on A-F such that A-D =7 “or 8”
Draw perpendiculars from A, D and F
A-B =1/8 waist +1/2”
A-C =1/2 “
D-E =1/8 hip + ½”
Join B-E and produce. This line meets the perpendicular drawn from F at G.
G-H =1/2”
Shape B-C and F-H
Cut along C-B-H and F
Cut along the folding line C-F and separate the sheets.

Layout 


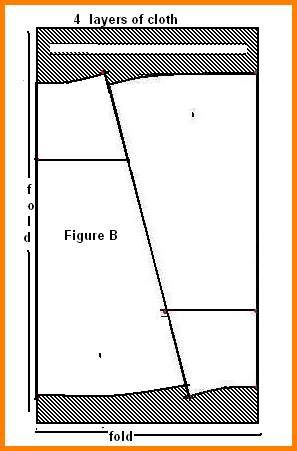
Fold the material twice, making 4 layers. Place the paper draft on the cloth as shown in the figure B and cut.

Parts


We get 6 panels 2 central panels, 2 right side panels and 2 left side panels as shown in figure C

Stitching 


Join the side panels to the central panel. 2-8 to 3-9, 4-10 to 5-11. Do the same thing to the other set .We get 2 pieces A and B, one set for back and the other for front. as shown in the figure D

Now we have to join front to back.Keeping right sides together join front to back. Join 1-5 to 4-8. On the other side keep an opening of 6”. Join9-6 to 10-7.Do not stitch the portion 2-9 and 3 -10 together.Turn them inside and stitch separately. This is the side opening.

waist band


Measure the top of the petticoat (waist line) and cut a waist band ABCD 6” wide and length equal to the top of the petticoat + I”. Fold ½” on ends A-C and B-D of the waist band and stitch. Fold ½” along A-B and C-D and crease Open the side A-B and attach it to the petticoat top from inside. Keep right side of the band and the wrong side of the petticoat together and stitch on the crease made earlier .Fold the band length wise stitch the edge C-D to the waist line so that the fold just covers the machine stitching at the waist line. Turn the bottom of the petticoat by 1” and stitch.-Run a draw string along the waist band.

Tuesday, May 26, 2009

How to stitch the neck opening


If the neck is small an opening can be made in front or back of the garment,Mark opening a-b on the garment.Do not cut.Cut a piece of facing P Q X Y, 4” wide and and the length being 2”more than the length of the opening.Mark the line of the opening of the same length on the facing also. Turn1/4 “ under on sides and bottom of the facing ( x-p, p-q and q-y). Fold the facing on the line a-b.Place the edge against the line a-b marked on the garment,keeping right sides together.Line a-b on the garment should coincide with the line a-b on the facing.Secure them with pins.Stitch along the m-b and n-b. (Slant lines} m-a = a-n =1/4” Reinforce at the point b.Cut along the line a-b taking care not to cut the stitches.Turn the facing to the wrong side.Crease along the seam line and press.Hem the edges x-p,p-q and q-y to the garment.

How to stitch a nightie

Front and Back
Draw the draft on a folded sheet of paper keeping A-N along the fold.
A-B =I/2 of  Shoulder width + ¼”.
A-F = Neck width =1/12 chest + ¼” or to taste.
A-G =Back neck depth = 2” or to taste.
A-H =Front neck depth =A-F or to taste.
A-D =1/8 chest +3”.
A-L =Waist length + ¼”
A-N = Full length + 1”
Draw perpendiculars from D, L and N
D-C =A-B. Mark point I such that I-C = 1”
Join B-I.On the line B-I mark E such that B-E =3/4"
D-J =1/4 chest + 2” or to taste.
L-K = D-J. Mark O such that O-K = ½” or to taste.
N-M =¼ chest + 10” or to taste. Join O-M.
M-P =3/4”.
Join points F-E, J-O and O-P. Shape P-N.
Shape back neck F-G and Back scye E-J.
Shape front neck F-H and front pcye E-I-J. (Shown in pink lines)
Cut along the line G-F-E-J-O-P-N.
Open the fold. Cut along folded line. Separate the sheet on which lines are not marked. This is the draft for the back of the nightie.
On the other portion of the sheet on which lines are marked cut the front neck shape F-H and front scye shape E-I-J.This is the draft for the front of the nightie.

Sleeves


Draw the draft on folded sheet of paper keeping A-C on folded line.
A-C =Sleeve length +1/4”
A-X = 1” for folding.
Mark point B. Such that B-C =1/8 chest.
Drop perpendiculars from X-A-and B.
A-D = Sleeve width =Half of sleeve round + ¾” for seems.
B-G = biceps = 1/8 chest + 3”.
X-F is marked a bit longer than A-D as shown the figure. This gives a good finish for the hem.
Join X-F-D-G-C.
Mark H such that H-C =1”. And Mark I such that I-G = 2”.
Shape G-H -C (back side of the sleeve).
Shape G-I -H -C (front side of the sleeve- pink line).
Cut along X-F-G-H -C. Open fold. Cut along the pink line G-I -H -C.

cutting


Prepare paper drafts of the parts of the nightie as described .Fold the material such that selvedges come to sides and right side together .Keep the fold line of the daft on the fold line of the material and cut. Open the fold of the draft of the sleeve. Place it on folded material and cut two sleeves together. While cutting plain material care should be taken not to cut two left sleeves or two right sleeves

Stitching

Stay stitch neck line, shoulders, armsyes and top of the sleeve .This avoids stretching of the fabric while handling. Join front and back bodice at shoulders. Stitch sleeve hem. Attach sleeve to the bodice taking care to match body front to sleeve front. Stitch neck line with bias binding. Stitch front and back sides of sleeves and bodice. Hem the bottom of the bodice.

Saturday, November 29, 2008

Pavade ( Long pleated skirt)


Measurements needed
Shoulder = A to B
Chest = C to D
Waist length = G to M
Waist = E to F
Sleeve width = I to J or K to L

draft of bodice

Front and back of the bodice of pavade draft is same except for the neck. It is economical to cut paper drafts and then cut the cloth. Draft should be drawn on 4 fold paper. Line 1 to 3 should be exactly on the fold. Draft of the back and front is drawn on four fold paper.

1 to 3 =length of the bodice +1/2 “,
1 to 2 = 1/8 chest +2”+1/2”, ( two and a half inches) draw perpendicular lines from 1, 2 &; 3.
1 to 6=shoulder (from nape to shoulder end, at the sleeve point) +1/4”,
1 to 7=neck width=1/12 chest+1/4”or to taste.
1 to 16 = back neck depth=2”+1/2” or to taste.
1 to 11= front neck length depth=1/8 chest or totaste .
Shape back and front neck as shown in the figure.
2 to 5 = 1/4 chest + 1” + 1/2 “.
2 to 9 = 1 to 6. Join 6 &; 9.
6 to 8= shoulder slope = ½”.Join 7 &; 8.
Shape arm hole 8 to 5. 2 to 5=3 to 4.
4 to 10 =1/2”. Join 5 and 10.
3 to 14 =1/12 chest + ½”
14 to 15 =2”+1/2” .
A dart of ¼” is taken at the point 14
Cut back draft( blue line )is cut on four folds. Back draft which is behind is separated. Front neck (green line) is cut on the remaining two folds. This will be the front bodice.

Skirt
Measurement needed for skirt
Length- length from waist to desired length.
Width- width of the skirt depends upon the gathers. 2 to 3½ times the waist measurement is suitable.
Stitching
Join shoulders. Stitch button stands. Stitch darts (½”)at the places shown in the bodice draft. Stitch armhole and neck with bias binding.
Stitch the sides of the skirt. Attach skirt to bodice distributing the pleats evenly around the waist.

Wednesday, November 26, 2008

This is to say hello

Hi ! I am vani.I like arts and crafts.I want share my craft work with you all.I hope you like my craft work.I like sewing also.comments and suggestions are invited